Have you ever created something that you thought was a very swell idea but then, when you stepped back to take a look, your eventual reaction was, “What have I done?” Or maybe you’re oblivious, like me, and it takes the discerning eye of someone else to open yours. Well, this happened to me awhile back.
First, an aside. I attended a manufacturing trade show some time ago. I came across a plastics company that was giving away books. Most companies give away a squishy ball with their name on it or a pen with a sample of the product they sell glued to the end or a pocket protector with their logo on it.
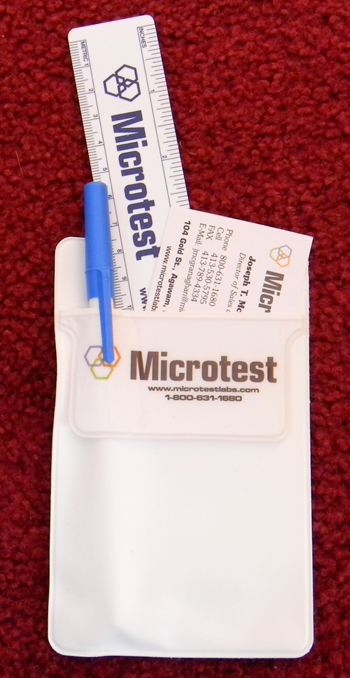
I’m a sucker for free stuff at shows because it makes me feel like Santa Claus when I get home after the show with a bag of candy bars, engraved pens and interesting product samples to present to my kids. Not only did American Plastic Molding Corp replace their product sample give-away with a free book (an unique offering in itself), but it was a book called, “Our Toilets are Not for Customers”.

Good book; full of anecdotal stories about customer service; written by the owner of AMPC, Floyd Coates. The book worked better than any squishy ball or candy bar ever could because it gave me a glimpse of what the owner stood for and his company’s values. I did some business with APMC because of that book and I recommend them for plastic injection molding. But that’s not the point of this aside. After reading Floyd’s book, I got excited about publishing my own book (“How to Make a BoogerBall, a Story about Life, Product Development and Keeping Your Nose Clean). I got so excited, I decided to contact the author to seek his advice about getting published. True to the image of the customer oriented man I read about in his book, Mr. Coates called me back. I was so overjoyed to talk to him that I took his call on my cell phone in a dressing room in Bloomingdales at the Mall of America and I took copious notes on a piece of cardboard that comes inside a dress shirt (found on the floor). He gave me lots of good advice including the name of his printing company, but it was after I directed him to BoogerBall.com and he (and his wife, Anne) read the story that my eyes were opened (finally the point of this lengthy aside). Floyd said that he liked the story but his wife had trouble looking at it because the BoogerBall looked too real. “It’s really gross.”
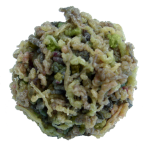
I never thought of my story as being particularly repulsive. Wacky, funny, ridiculous, but not gross. It’s not real. It’s just rubber cement. Then I got an email from a guy who took me up on my request to send in a picture. The photo he sent was of a small, smooth, round ball the size of a quarter. It was somewhat green and looked a little gooey. It was a real ball of real boogers. It was so gross to me that I almost hurled on the computer keyboard just looking at it. My eyes are now opened. The BoogerBall idea is fun, wacky, interesting, and very gross – especially if you think even for a second that it could be real.
My goal for this project is to teach people something they don’t know, to entertain and to enlighten but not to disgust. While I can’t ‘not show’ the BoogerBall while telling the story of how it’s made, I can soften the gag reflex by not using a photo of it in the ubiquitous logo. So this lesson contains various tools and methods for refining our BoogerBall logo. Let’s make it less gross, more fun, less realistic and more stylized. It’s true that this product is on the fringe of societal appeal (there are only so many 12 year old boys out there), but with a less realistic logo, we might be able to bring it slightly closer to main stream (by not grossing out their mothers).
I used the following techniques to convert a photograph of the BoogerBall into a stylized vector graphic suitable for use as a logo. Each of these methods has its roots in my past. These are tools that I have found useful. This means that you may conversely find them trite, redundant or obsolete and you may also find them useful but they seem to make sense to me.
The first problem is to simplify the photograph into a stylized line drawing. The second problem is to create a digital version of the line drawing. The third task is to create a vector version of the digital drawing. The final step is to complete the logo with color and line weights.
 I like to work in the real world as much as possible; pushing pencil and paper instead of pushing electrons. This is why this post was first written out longhand in my notebook. So, I began with a printed copy of the BoogerBall photo. The desire is to have a line drawing with maximum contrast (black lines on white paper) to facilitate the future steps. To accomplish that, I created what can be thought of as poor-man’s carbon paper. You see, way back in the olden days, in order to make a duplicate copy of a typed letter, a typist would use a piece of black, chalky “carbon paper” sandwiched between two pieces of paper. Poor-man’s carbon paper is a technique we played with in elementary school. You scribble on the back of a piece of paper with a dark pencil or crayon. Turn it over and place it over another piece of paper. Anything drawn on the first page will be, in turn, transferred to the second page. The more shading you do to build up the “carbon”, the darker the transferred drawing will be. So, I shaded the back of my photo good and dark and then traced a simplified version of the BoogerBall over the photo.

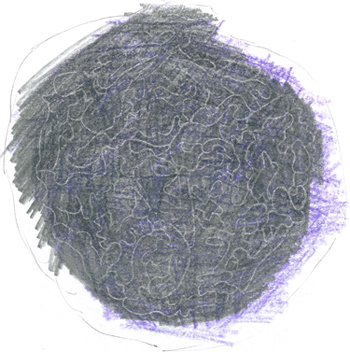
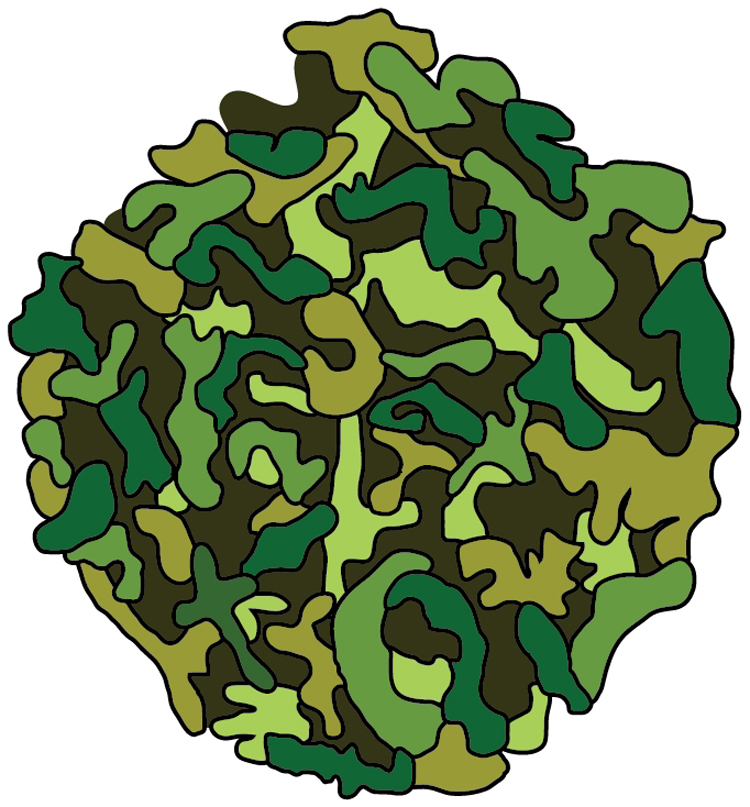
The traced drawing transferred to a clean piece of paper. The result is a drawing with high contrast and cartoon styling (I made the boogers bigger with a little less detail) that is ready for the next step.
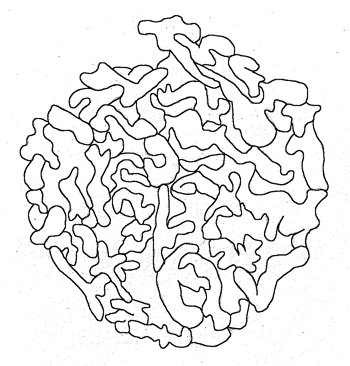
Simple scanning converts the line drawing into a digital image for tracing. You can also use your phone to take a picture of the drawing and email it to yourself. (I can’t believe I just wrote that – it’s like saying you can also use your elbow to pick your nose – it doesn’t seem possible.) Once you get the line drawing back to digital format, you’re ready for the next step – vector conversion.
Now, there are a number of ways to trace a line drawing to make a vector version. If you use Adobe Illustrator (AI), you can use the trace tool to do the job. Being an engineer and a CAD guy, I find that I am not as comfortable with the free form artistry of manipulating vectors in AI. I seem to spend extra time trying to make it mathematically perfect which is not always easy to do in Illustrator. Because I have thousands of hours of AutoCAD experience, my favorite technique is to put the image into a 2D CAD program. Draftsight is my latest tool of choice because it is an AutoCAD clone so my skills are still relevant and because it is free.  I own a license of AutoCAD but I can load Draftsight on all of my computers and teach its use to others more easily because it’s a free download (which, I’m sure, is part of Dessault’s marketing plan and I’m playing right along). Like AutoCAD, Draftsight lets you load a reference to an image file for tracing and that’s just what we are going to do.
I recommend placing your image file on a different layer from your tracing vectors so they can be easily isolated by turning layers on or off. 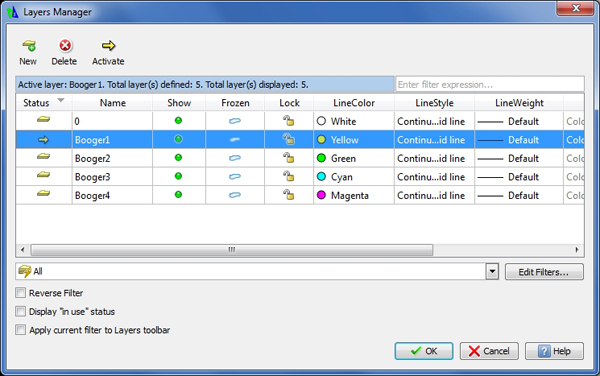 Another good use for layers is to isolate different colors. In addition, the use of layers will help simplify our design. Our BoogerBall will eventually consist of multiple boogers in different shades of green. Rather than have every little splotch of color be its own closed vector shape that needs to be created and filled with color, we can create a large background shape of a single color and then layer the smaller booger shapes of differing color on top. All of the little spaces and gaps in-between will be filled with the background color.
 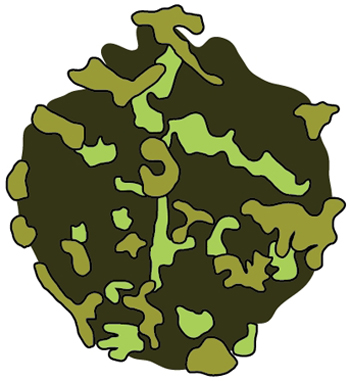 Because AI will import layers along with geometry from a DWG file, you can begin organizing and separating the different colored shapes on different layers now and save yourself some tedious work later.
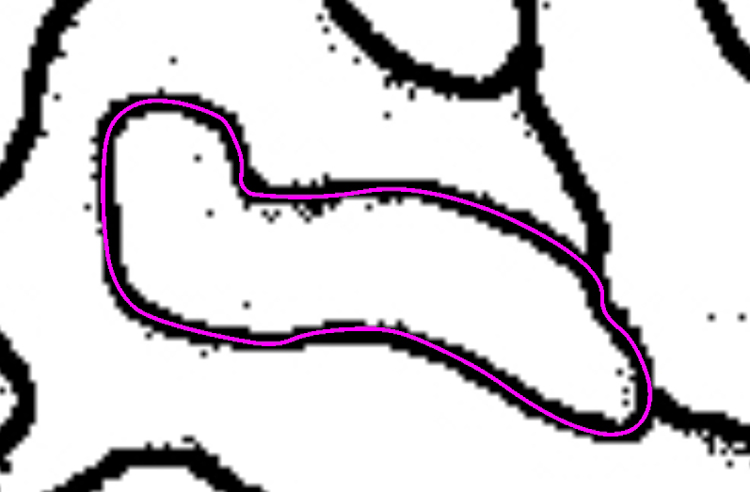
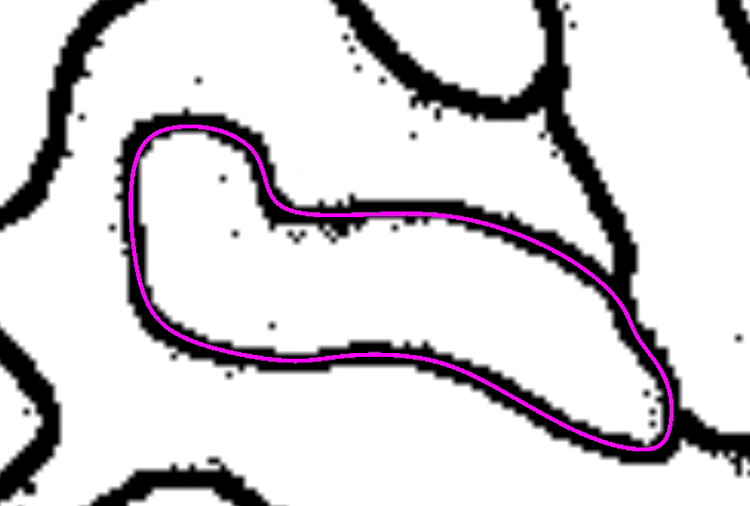
I use two tracing methods in Draftsight that eventually converge to produce the desired result. The goal is to have closed geometric shapes that can easily be filled with color in AI. The first method is to use the arc command many times in succession to trace a booger. The CAD tool will automatically repeat the last command if Enter or the Space Bar is pressed so after making one arc on the path, it’s easy to keep going. Hitting Enter or Space again causes the first point of the arc to be a continuation of the last point of the previous arc making both arcs tangent to each other (a smooth looking transition). Because of this, you can quickly trace an organic (curvy) object by making one arc and then repeating Enter, Enter, Click, Click as many times you need to complete the path. The resulting geometry will be many small arcs as separate entities. 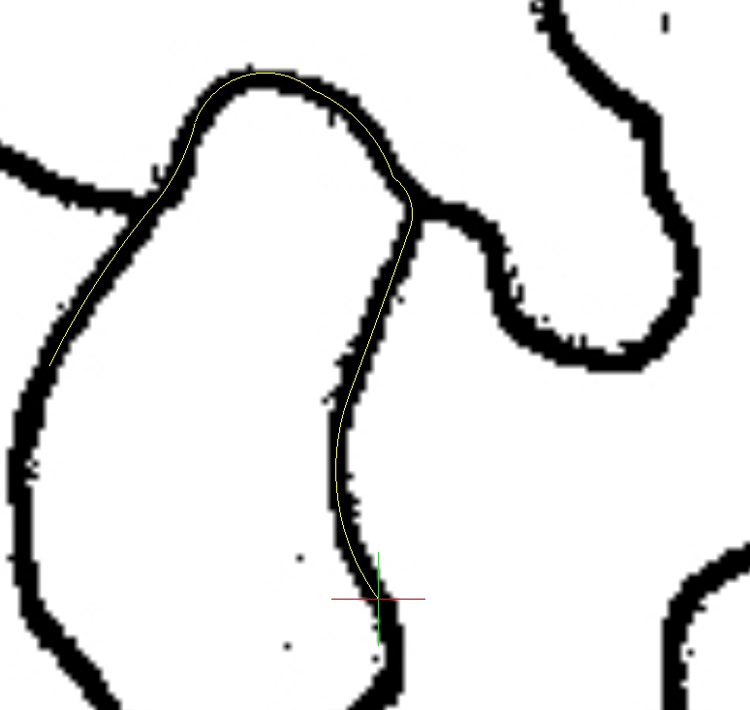 While AI has tools to convert this to one path (Pathfinder), the CAD tool can do it just as quick (you’re already here, anyway) by choosing the PEDIT command. PEDIT will convert the first arc you select into a Polyline (a single continuous entity made from many). Using the Join option, you can add all of the remaining arcs to the path. With the Close option, you can be confident that the final result is a closed Polyline (i.e. one that can be filled with color in AI). The alternate method for creating a closed, curvy shape is to use the PLINE command which creates a multifaceted Polyline of small, straight line segments as you make clicks along the desired path. Again, use Close to be sure the Polyline is completely closed.
 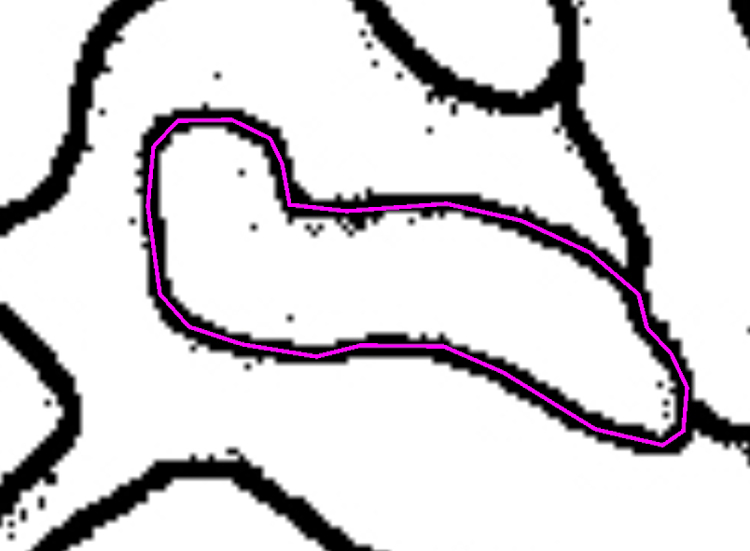 Then use PEDIT and either the Fit Curve or the Spline Curve option to make the path smooth. This second method will be faster than the first because you are just making a bunch of short line segments and letting the CAD tool make the curves, but you will have less control over the final outcome, especially where your booger shapes make sharp corners or tight reversing turns. As you repeat this process, you will eventually trace all of your boogers onto different layers and you will be ready for color and fine tuning in AI.
Importing your vector BoogerBall into AI is as simple as closing Draftsight (be sure to SAVE) and opening the DWG file in AI. The Options box that pops up gives you the opportunity to scale your image, or center it on the Artboard. 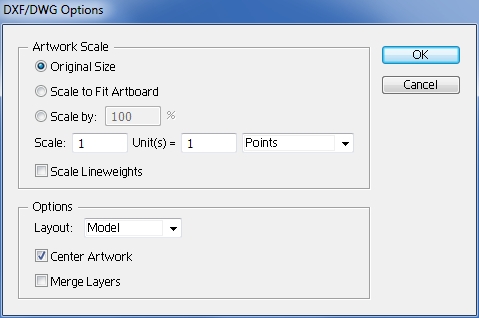 I recommend experimenting with these options. Be sure to leave the Merge Layers option unchecked so all that extra work you did to isolate layers in Draftsight isn’t lost in translation. After the file is opened and you SAVE it to a new AI file, it’s fairly easy to isolate a layer at a time, select all of the booger shapes, and choose a fill color to fill them.

Within just a few moments, you can have a complete BoogerBall design that’s exactly what we are looking for, a stylized vector graphic suitable for use as a logo that doesn’t excite the gag reflex of our “real” BoogerBall. I did a little extra work to integrate the Wordmark and added a little stylized shadow. Now we can move on to bigger and better things like building a fun WordPress website and earning traffic to it.

Update: After working on this one post for over a year I’ve come to realize that the opening sentence applies to this post and the whole BoogerBall concept. I am moving on to a new subject – a new project that has many more redeeming qualities and an infinite range of learning opportunities (with more posts to illuminate them). Look for future posts about Engineering For Everyone, an educational program I have been developing. You’re probably saying, “Thank goodness, that was really too gross!”
Update#2: I just learned last week that Floyd Coates passed away after a battle with cancer. I will miss him as he inspired me to keep going with my writing. I look forward to greeting him in Heaven some day.